AWS Cost Categories Explained


AWS Cost Categories is a free AWS feature that helps you organize and group your cloud expenses by teams, departments, projects, or cost centers. It uses rules based on dimensions like linked accounts, tags, services, and regions to simplify cost tracking and allocation. Once set up, these categories integrate seamlessly with AWS tools like Cost Explorer, Budgets, and Cost and Usage Reports, giving you actionable insights into your spending.
Key Features:
- Custom Grouping: Organize costs by teams, projects, or other business units using rule-based filters.
- Dimensions: Group costs by linked accounts, services, tags, regions, and more.
- Split Charge Rules: Allocate shared costs (like support fees) proportionally, evenly, or by fixed percentages.
- Integration: Works across AWS tools for budgeting, reporting, and anomaly detection.
- Automation: Updates are applied within 24 hours and can retroactively adjust up to 12 months of billing data.
AWS Cost Categories simplifies cloud cost management, making it easier to track spending, allocate shared costs, and align expenses with your business structure. This tool is especially useful for organizations with complex hierarchies or multi-team setups.
AWS Cost Categories | Amazon Web Services
Key Concepts and Terminology
Before diving into AWS Cost Categories, it’s important to grasp the basic concepts that form the backbone of this tool. These elements help you align AWS billing data with your organization’s cost structure, ensuring accurate and meaningful cost management.
Cost Category Names and Values
The Cost Category Name is essentially the broad label for your grouping. It defines the lens through which you’ll view and organize your costs. Examples include labels like "Team", "Department", "Project", or "Cost Center".
Cost Category Values, on the other hand, are the specific subgroups within that broader category. For instance, if "Team" is your Cost Category Name, the values might include "Alpha", "Beta", and "Gamma". Each AWS account allows you to create up to 50 unique Cost Categories.
If certain costs don’t match any of your defined rules, they’ll show up as "Uncategorized." However, you can assign a Default Value to provide a custom label for these unmatched costs, making your reports more meaningful.
Dimensions and Rule Types
Dimensions are the attributes AWS uses to filter and group costs. AWS provides seven dimension types: Linked Account, Charge Type, Service, Usage Type, Cost Allocation Tags, Region, and other Cost Categories. These dimensions are the building blocks for your categorization rules.
AWS Cost Categories supports two types of rules:
- Regular Rules: These allow manual grouping of costs by selecting specific dimensions and conditions. For example, you can assign all costs from a specific Account ID to "Marketing."
- Inherited Rules: These work automatically, creating Cost Category values based on the values of a given dimension. For example, if you use a "Project" tag with 50 unique values, an inherited rule can generate all 50 Cost Category values without manual input.
Rules are processed in a top-down order, meaning the first rule that matches a billing line item determines its category value. The Rule Builder, a graphical interface, supports up to 100 rules per category using only AND logic. For more complex setups, the JSON Editor allows up to 500 rules and supports nested conditions with OR and NOT operators.
Split Charge Rules
Split Charge Rules manage shared costs that can’t easily be assigned to a single owner - such as enterprise support fees or data transfer charges. These rules redistribute costs from a "source" to one or more "targets" using three methods:
| Allocation Method | Description |
|---|---|
| Proportional | Costs are distributed based on the proportional weighted cost of each target. |
| Fixed | Costs are allocated based on user-defined percentages for each target. |
| Even Split | Costs are divided equally among all targets. |
You can define up to 10 split charge rules for a single Cost Category. It’s worth noting that split charge results are visible only on the Cost Categories details page and in CSV reports - they won’t appear in Cost Explorer or alternative management tools or AWS Budgets.
How AWS Cost Categories Work
AWS Cost Categories use a dynamic, rule-based system to group billing line items automatically, ensuring a streamlined approach to cost tracking and management.
Rule-Based Logic and Dimensions
The rule-based engine in AWS Cost Categories evaluates your billing line items against a set of custom rules during the bill computation process, which occurs several times daily. These rules rely on the primary dimensions mentioned earlier to determine how costs are grouped.
Rules are processed in a top-down order, meaning the first matching rule takes precedence. If a cost line item matches multiple rules, it will be assigned based on the highest-priority rule. For example, if you want shared infrastructure costs to be captured before team-specific costs, you need to place those shared cost rules at the top. Operators like "ANY" allow grouping multiple conditions (e.g., combining regions like us-east-1, us-west-1, and us-west-2 into a "North America" category), while "ALL" ensures all conditions are met for more detailed tracking. For organizations with complex needs, the JSON editor supports up to 500 rules per category, compared to the 100-rule limit in the Rule Builder. It also allows for advanced logic, including nested conditions or operators like "NOT" and "OR."
Automation and Visibility
When you create or modify a Cost Category, AWS updates the billing data automatically within 24 hours. These updates include retroactive adjustments for up to 12 months as the status transitions from "processing" to "applied".
Once defined, Cost Categories become a new dimension across AWS Billing and Cost Management tools, such as Cost Explorer, AWS Budgets, AWS Cost and Usage Reports, and AWS Cost Anomaly Detection. This integration ensures that your categorization logic is consistently applied across all tools. As Tim Tam, Senior Product Manager for AWS Cost Management, explains:
"The rule-based engine can be a powerful tool for you to map even the most complex use cases".
The automation also extends to shared cost allocation through split charge rules. These allocations can be reviewed on the Cost Categories details page, showing "before and after" cost distributions. However, these adjustments are not reflected in Cost Explorer.
With this seamless integration across AWS tools, Cost Categories provide an efficient way to track and allocate costs with precision.
How to Set Up AWS Cost Categories
Accessing the AWS Billing and Cost Management Console
To get started, sign in using the management account for your AWS Organization - member accounts don’t have the ability to create Cost Categories. Make sure AWS Cost Explorer is enabled, and confirm that your IAM policies allow access to both the Cost Explorer console and API.
Once you're signed in, navigate to the AWS Billing and Cost Management console and select Cost Categories. From there, you can create your first category. Keep in mind, each account can have up to 50 Cost Categories.
Defining Rules and Assigning Dimensions
When setting up a new Cost Category, you’ll need to choose between two types of rules: Regular rules for manual grouping or Inherited rules for automatic grouping based on account names or tag keys. Using the Rule Builder, you can organize costs by dimensions such as Accounts, Cost allocation tags, Service, Charge Type, Region, Usage Type, Billing Entity, or even other Cost Categories for hierarchical setups.
The Rule Builder allows up to 100 rules per category, while the JSON editor supports up to 500 rules for more complex configurations. Here’s a tip: keep AWS Cost Explorer open in a separate tab to easily reference tags and account IDs. Since rules are processed from top to bottom, it’s a good idea to place shared cost rules at the top to ensure they’re accounted for before applying department-specific rules.
You’ll also have the option to set an "Effective Date." If you select a date in the past, AWS will retroactively apply the rules starting from that point. Additionally, defining a "Default Value" like "Other" or "Unallocated" ensures that any unmatched costs are captured.
Once configured, these settings seamlessly integrate with other AWS cost management tools without requiring additional steps.
Enabling Cost Categories for AWS Tools
There’s no manual activation needed for Cost Categories to work with other AWS tools - they integrate automatically. After creating a category, its status updates to "Applied" within 24 hours. At that point, the Cost Category becomes available as a dimension in tools like Cost Explorer, AWS Budgets, AWS Cost and Usage Reports (CUR), and AWS Cost Anomaly Detection.
However, split charge rules are only visible on the Cost Categories details page and won’t show up in Cost Explorer, Budgets, or CUR. If you need historical data in your CUR beyond the current month, you’ll need to contact AWS Support to request a backfill for specific billing periods.
Common Use Cases
Building on the core AWS Cost Categories functionality, this section dives into practical ways they can be applied.
Tracking Costs by Teams or Departments
Cost Categories let you track spending by specific organizational units like teams or departments. For instance, you can create a "Department" or "Team" category and set rules based on AWS accounts, cost allocation tags, or services. If your engineering team uses accounts tagged with "Team:Engineering" and marketing uses "Team:Marketing", you can easily group costs for each team automatically.
It’s a good idea to prioritize shared infrastructure rules at the top of your list. For example, if you have resources tagged as "Team:Infra" that support multiple departments, placing this rule first ensures those costs are captured before the system applies department-specific rules.
For organizations looking to simplify rule management, Inherited Value rules are a game-changer. Instead of manually updating rules for every new team, you can configure AWS to automatically generate category values based on a specific tag key. For example, if your "Team" tag includes values like "alpha", "beta", and "gamma", AWS will dynamically create matching cost category values without requiring manual updates.
Implementing Chargeback Models
Chargeback models rely on accurate cost distribution, and Cost Categories make this achievable using Split Charge rules. These rules allow shared costs to be allocated fairly across departments, aligning with broader financial strategies for commitment management.
You can choose from three allocation methods:
- Proportional: Allocates costs based on actual resource usage, ideal for ensuring fairness.
- Fixed: Distributes costs using predefined percentages, useful for contracts or strict budgets.
- Even Split: Divides costs equally among targets, perfect when detailed tracking isn’t necessary.
Important: Split charge outcomes are visible only on the Cost Categories details page or in CSV reports.
Monitoring Costs for Multi-Level Hierarchies
For organizations with layered reporting needs, Cost Categories can help you build hierarchical cost structures. For example, you might create a "Team" category that rolls into a "Department" category, which then aggregates into a "Cost Center" category. This setup mirrors your organizational hierarchy, making it easier to track costs at every level.
To ensure no costs are overlooked, define a Default Value like "Other Teams" or "Unallocated" for resources that don’t match any specific rules. This ensures all spending is captured, even for resources that lack proper tags.
These examples show how Cost Categories can align with different organizational needs and structures, making cost management more efficient and transparent.
AWS Cost Categories Quotas and Limitations
AWS Cost Categories Quotas and Limitations Overview
Quotas and Limitations
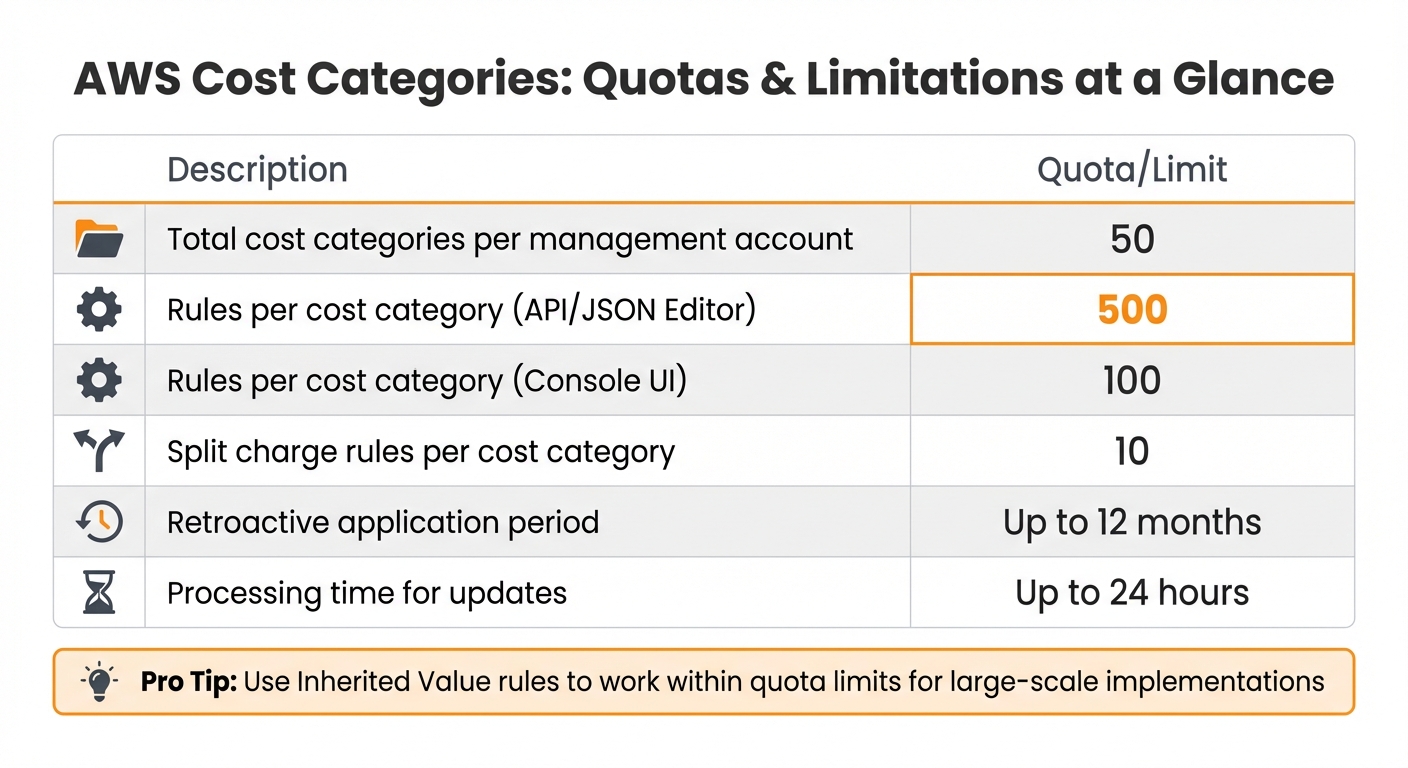
When working with AWS Cost Categories, there are specific limits to keep in mind. For starters, you can create up to 50 cost categories per management account. Each cost category can have a maximum of 500 rules when using the API or JSON editor, but if you're using the console UI, you're limited to just 100 rules. If you need more than 100 rules, switching to the JSON editor is the way to go.
Split charge rules come with their own restrictions. You can create up to 10 split charge rules per cost category. Additionally, a cost category value can only act as a "source" once across all split charge rules. It also cannot be both a source and a target within the same category.
Keep in mind that changes to cost categories - whether created or updated - can take up to 24 hours to reflect in usage records.
| Description | Quota/Restriction |
|---|---|
| Total cost categories per management account | 50 |
| Rules per cost category (API/JSON Editor) | 500 |
| Rules per cost category (Console UI) | 100 |
| Split charge rules per cost category | 10 |
| Retroactive application period | Up to 12 months |
| Processing time for updates | Up to 24 hours |
These limitations are particularly important for large-scale implementations.
Impact on Large-Scale Implementations
For organizations managing complex structures, these quotas demand careful planning. If you oversee numerous teams or projects, creating individual rules for each could quickly max out the 500-rule limit. A practical workaround is to use Inherited Value rules, which allow cost category values to be dynamically generated based on tag keys or account names. This eliminates the need for manually defining a rule for every new value.
Another challenge lies in split charge visibility. According to AWS, "Split charge rules as well as the resultant cost allocations are only presented within Cost Categories and are not surfaced in other Cost Management products such as AWS Cost Explorer, AWS Budgets, and AWS Cost Anomaly Detection". This means you'll need to rely on the Cost Categories details page or export data to CSV files for accurate chargeback reporting.
For enterprises managing dozens of AWS accounts across multiple regions, creating hierarchical cost structures is a smart approach. For example, you can use one cost category as a dimension for another, such as Teams > Departments > Cost Centers. This strategy helps you stay within quota limits while still achieving the level of detail required for effective cost tracking.
Integrating AWS Cost Categories with Other AWS Cost Management Tools
Once configured, AWS Cost Categories become a powerful tool, seamlessly integrating with other AWS cost management solutions. Your custom category names automatically show up as new dimensions and filters in AWS Cost Explorer, AWS Budgets, and AWS Cost Anomaly Detection. This integration allows you to analyze spending, set budgets, and monitor anomalies based on your organizational structure. Plus, Cost Categories can be applied retroactively for up to 12 months, giving you flexibility in reviewing historical data.
In AWS Cost Explorer, the Cost Categories details page includes a convenient "View in AWS Cost Explorer" link. Clicking this opens a filtered view of your costs. Any expenses that don’t match your defined rules are grouped under a "No Cost Category" label. This feature helps you spot areas where costs haven’t been allocated properly, ensuring nothing slips through the cracks.
Cost Categories also act as custom filters when setting spending limits. As Tim Tam puts it:
"Cost categories empower you to map your costs into your specific business units or teams".
In AWS Cost and Usage Reports (CUR), each Cost Category appears as a dedicated column, with corresponding values assigned to each billing line item. For more in-depth analysis, you can query this data using Amazon Athena. This integration across tools significantly boosts your ability to analyze and manage costs.
Important: Split charge allocations are only visible on the Cost Categories details page. They won’t appear in AWS Cost Explorer, AWS Budgets, or the CUR. If you need chargeback reporting with split charge rules, you’ll need to export the data to CSV files or use the Cost Categories dashboard.
Optimizing AWS Costs with Opsima

Opsima takes the insights provided by AWS Cost Categories and turns them into real savings by optimizing rates. While AWS Cost Categories help you understand where your costs are coming from, Opsima focuses on reducing those costs by automatically managing Savings Plans and Reserved Instances. The result? Cost reductions that can typically reach up to 40%, with potential discounts as high as 72% on compute resources.
What makes Opsima unique is that it doesn’t require any changes to your infrastructure. It works with billing-level permissions only, meaning it never accesses your applications, code, or customer data. Your AWS resources - whether EC2 instances, Lambda functions, or RDS databases - stay exactly as they are. The only difference is that you pay less for them.
This combination of tools - AWS Cost Categories and Opsima - creates a powerful system for managing and reducing costs. Cost Categories help you answer "who" and "where" by grouping expenses into logical business units. Meanwhile, Opsima tackles the "how much" by ensuring your resources are billed at the best possible rates. For example, Cost Categories might show you how much your engineering, marketing, and operations teams are spending. Opsima steps in to apply the optimal commitment strategies, maximizing savings across all departments. In essence, Cost Categories organize your billing data, while Opsima ensures you pay the lowest rates.
Getting started with Opsima is quick - it takes just 15 minutes. You can even use your existing Cost Categories to track how Opsima’s optimizations impact specific departments, applications, or multi-level hierarchies. If you’re using Split Charge Rules, Opsima-generated savings can be allocated fairly across teams.
Opsima supports a broad range of AWS services, including EC2, ECS/Fargate, Lambda, RDS, Aurora, ElastiCache, OpenSearch, DynamoDB, Redshift, and SageMaker. This wide coverage allows you to optimize costs across nearly your entire AWS environment.
Conclusion
AWS Cost Categories provide a powerful way to manage cloud spending by aligning costs with your business structure - whether that’s teams, departments, projects, or cost centers. This alignment brings greater visibility and accountability to your financial decisions, making it easier to track and manage expenses effectively.
The tool offers several useful features, such as split charge rules, hierarchical mapping, and the ability to analyze costs retroactively for up to 12 months. Plus, since AWS Cost Categories is free to use, there’s no financial hurdle to get started.
"Tracing your cost and usage information back to specific teams, projects, and initiatives is crucial to providing cost transparency across your organization, so you can quickly scale resources up and down, according to real-time business needs." - AWS Cloud Financial Management
By combining the clarity provided by AWS Cost Categories with tools like Opsima, which focuses on automated commitment management, you can achieve a more comprehensive approach to cloud cost efficiency. While Cost Categories help answer "who" and "where" the spending occurs, Opsima works on optimizing "how much" you're spending, ensuring you get the best possible pricing.
To maximize the benefits, it’s essential to adopt a clear tagging strategy, keep an eye on uncategorized spending, and use split charge rules to allocate shared costs effectively. These practices will set the stage for improved financial control and efficiency in your cloud environment.
FAQs
When should I use Cost Categories instead of tags?
Cost Categories are a better choice than tags when you need to group and analyze AWS costs using more complex rules or multiple dimensions. They provide greater flexibility and allow for a more detailed breakdown of your spending. This makes them especially useful for handling advanced cost management needs.
How do I decide the best rule order to avoid miscategorized costs?
To ensure accurate cost allocation in AWS Cost Categories, it's crucial to arrange your rules thoughtfully. AWS processes these rules sequentially, meaning the order in which they're listed directly impacts how costs are categorized.
Start by placing the most specific and critical rules at the top. These rules target precise costs and help ensure they are categorized correctly. Once you've addressed the specific cases, follow up with broader rules to handle less-defined costs. This approach reduces the risk of misclassification and keeps your cost data as accurate as possible.
In short: prioritize precision and order your rules carefully to allocate costs where they truly belong.
How can I report split charge allocations outside the Cost Categories page?
To report split charge allocations outside the Cost Categories page, you need to define split charge rules within your cost categories. These rules allow you to distribute shared costs across multiple category values using different methods, such as proportional splits, fixed amounts, or equal divisions. This approach ensures shared expenses are allocated accurately based on the method you select.