AWS Cost Allocation Tags: Service-Level Spend Insights


AWS Cost Allocation Tags let you break down your cloud expenses by team, project, or application. Instead of a single large bill, these tags provide clarity on where your money is going. Here's what you need to know:
- Two Types of Tags: AWS-generated tags (e.g.,
aws:createdBy) and user-defined tags (e.g.,Project: Marketing). - Activation is Key: Tags must be manually activated in the AWS Billing console before they appear in cost reports.
- Limits: Up to 50 tags per resource, with keys up to 128 characters and values up to 256 characters.
- Not Retroactive: Tags only track costs after activation and take up to 24 hours to reflect in reports.
Why Use Tags?
They help identify cost drivers, improve accountability, and enable practices like showback (reporting costs) or chargeback (billing departments). Tools like AWS Cost Explorer and AWS Budgets make it easier to analyze tagged expenses.
To get started, define consistent tags, attach them to resources, and activate them for billing. Use tools like the AWS Tag Editor or CloudFormation templates to manage tags efficiently. Consistency in naming (e.g., CostCenter vs. costcenter) is crucial to avoid fragmented reports. To see the impact of optimized tagging on your bottom line, you can estimate your savings with a personalized report.
Prerequisites for Using Cost Allocation Tags
Required AWS Account Access and Tools
Before diving into tagging, make sure you have the right AWS access and tools in place. If you're working within an AWS Organization, only the management (payer) account has the authority to activate cost allocation tags. While member accounts can tag resources, they can't enable those tags for billing purposes. For standalone accounts, you have full control over creating and managing your tags.
Another key step is ensuring proper billing permissions. In Account Settings, you need to enable "IAM User and Role Access to Billing Information." Without this, only the root account can manage or view billing data. This step is essential - without it, even users with administrative permissions won't be able to activate tags or analyze spending.
You'll also need access to specific cost management tools. These include enabling Cost Explorer for filtering spending with tags, setting up alerts using AWS Budgets, and analyzing detailed data through AWS Cost and Usage Reports. Keep in mind that you must compare Opsima vs AWS Cost Explorer to understand why the native tool must be enabled for tag-based analysis. To tag resources efficiently at scale, use the AWS Tag Editor, available through the Resource Groups console.
One important note: cost allocation tags aren't retroactive. Once you activate a tag in the Billing console, it can take up to 24 hours for the activation to appear in your reports. Additionally, if an account is moved to a new organization, any previously active tags will lose their status. In such cases, the new management account must reactivate those tags.
How to use cost allocation tags from Cost Explorer to see resource specific cost
How to Implement Cost Allocation Tags
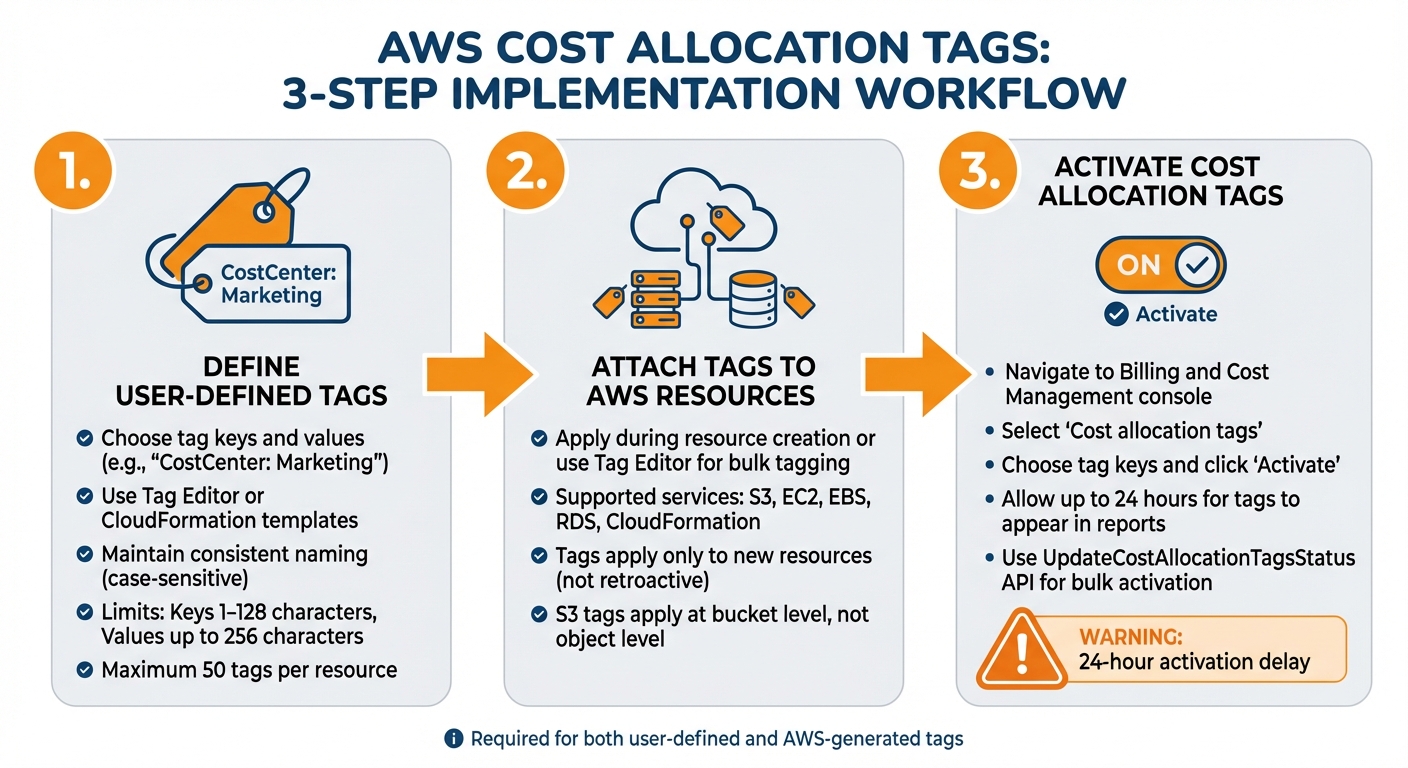
3-Step Guide to Implementing AWS Cost Allocation Tags
Step 1: Define User-Defined Tags
Start by deciding on the tag keys and values that will help you track costs effectively. For instance, you might use tags like "CostCenter: Marketing" or "Project: Trinity." These tags will appear in your cost reports with a "user:" prefix, while AWS-generated tags will have an "aws:" prefix.
You can create these tags in two main ways:
- Using the Tag Editor: Go to Services > Management & Governance > Resource Groups & Tag Editor in the AWS Management Console.
- Automating with IaC tools: For example, you can include tags in your AWS CloudFormation templates. Here's a sample template for an EC2 instance:
Ec2Instance:
  Type: AWS::EC2::Instance
  Properties:
    ImageId: !FindInMap [RegionMap, !Ref "AWS::Region", AMI]
    Tags:
      - Key: "cost-center-id"
        Value: "ABC123"
When creating tags, ensure consistency in your naming conventions. Tag keys are case-sensitive, and the cost allocation report will treat "CostCenter" and "costcenter" as entirely separate columns. Stick to a uniform style to avoid confusion. Tag keys can be 1–128 Unicode characters, while tag values can be up to 256 characters. Additionally, you can attach up to 50 tags per resource, but make sure not to include sensitive information in your tags.
Once your tags are defined, the next step is to attach them to your AWS resources.
Step 2: Attach Tags to AWS Resources
Tags can be applied to resources during their creation through the AWS Management Console or added in bulk using the Tag Editor. These tags work across various AWS services, such as S3 buckets, EC2 instances, EBS volumes, RDS instances, and CloudFormation stacks.
It’s important to note that tags only apply to resources created after the tag has been defined. They won’t retroactively apply to existing resources. For example, in the case of S3, tags are applied at the bucket level, not to individual objects within the bucket.
After applying your tags, you’ll need to activate them in your billing console to include them in cost reports.
Step 3: Activate Cost Allocation Tags
Simply applying tags to resources isn’t enough to make them appear in your cost reports. You’ll need to activate these tags manually in the Billing and Cost Management console. Here’s how:
- Navigate to the Billing and Cost Management console.
- Select Cost allocation tags.
- Choose the tag keys you want to activate.
- Click Activate.
This activation process is required for both user-defined tags and AWS-generated tags, such as "createdBy." Once activated, allow up to 24 hours for the tags to appear in your reports.
Some tags, like "awsApplication" (used for resources tied to AWS Service Catalog AppRegistry), activate automatically. However, for large-scale environments, you can use the UpdateCostAllocationTagsStatus API operation to activate multiple tags simultaneously.
Keep in mind that activating or deactivating a tag key will impact all associated values. Plan carefully to ensure your cost allocation strategy remains consistent and effective.
How to Analyze Service-Level Spending
Using Cost Explorer and CSV Reports
Once your cost allocation tags are activated, you can start turning billing data into actionable insights. AWS Cost Explorer, available in the Billing and Cost Management console, is a great tool for analyzing service-level spending. After activating your tags, allow up to 24 hours for data to populate. To examine costs for specific services - like EC2 instances or Lambda functions - use the "Service" filter. Then, apply the "Group by" option with "Tag" to break down expenses by your chosen allocation tags, such as Project or Cost Center.
Cost Explorer also highlights untagged resources with its "No tag key" indicator, helping you identify unallocated costs.
For deeper analysis, export your cost data as a CSV file. These reports include columns for each active tag key, with user-defined tags labeled as user: and AWS-generated tags as aws:. Cost Explorer provides up to 13 months of historical data and even offers spending forecasts for the next 12 to 18 months, based on your previous usage patterns.
Using Automated Tools for Cost Monitoring
While manual analysis is helpful, automated tools can simplify ongoing FinOps maturity journey. For example, Opsima allows real-time monitoring of tagged spending across AWS services, potentially cutting cloud costs by as much as 40%.
AWS also offers built-in automation features to keep your spending in check. AWS Cost Anomaly Detection uses machine learning to spot unusual spending patterns and sends alerts when anomalies are linked to specific tags. With AWS Budgets, you can set custom thresholds and trigger automated actions if spending on tagged resources exceeds your limits. For the most detailed insights, AWS Cost and Usage Reports (CUR) deliver comprehensive CSV or Parquet files, including all active cost allocation tags. These files can be further analyzed using tools like Amazon QuickSight.
Best Practices for Cost Allocation Tags
Define and Enforce Consistent Tagging Standards
When tags are inconsistent, cost reports become fragmented, making it harder to pinpoint service-level spending. Since AWS tags are case-sensitive, variations like CostCenter, costcenter, and COSTCENTER are treated as entirely different keys. For your finance team, this means multiple line items for what should be a single consolidated view.
To avoid this, create a centralized tagging dictionary and enforce the use of core business tags (e.g., CostCenter). At the same time, allow teams the flexibility to add their own technical tags. AWS provides tools to help enforce tagging rules, such as Tag Policies to restrict key values, Service Control Policies (SCPs) to block resource creation without required tags, AWS Config with the required-tags rule to monitor compliance, and the AWS Tag Editor to fix discrepancies.
Here are key tag categories to consider:
- Business tags: For instance,
cost-center-idwith values like12345or67890to allocate budgets for internal billing. - Technical tags: Tags like
environment-id(e.g.,prod,staging,dev) help distinguish production costs from testing. - Project tags: Use tags such as
project-id(e.g.,alpha-v2,migration-2026) to track spending for specific initiatives. - Ownership tags: For example,
ownerwith values liketeam-devopsorplatform-engidentifies who is responsible for the resources.
Once you’ve established clear tagging standards, roll them out progressively to ensure adoption.
Start Small and Scale Gradually
After setting up a standardized tagging strategy, roll it out in manageable steps. Overloading teams with too many tags at once can reduce compliance. Start with a small set of 3–5 essential tags such as Project, Owner, Environment, CostCenter, and Application. This approach keeps things simple while still providing valuable cost insights.
When teams consistently apply these core tags and enforcement mechanisms are in place, you can gradually expand the tagging framework. Keep in mind that tags only start recording costs from the moment they’re activated. It may take up to 24 hours for newly activated tags to show up in your billing console. Also, consider enabling AWS-generated tags like aws:createdBy, which automatically tracks the IAM user or role responsible for creating a resource. This adds accountability without requiring additional manual effort.
Conclusion
AWS cost allocation tags make it easier to track and manage your cloud expenses by breaking down costs into categories like applications, business units, projects, or environments. This detailed view lets you pinpoint which workloads are driving costs, evaluate the return on specific initiatives, and implement showback or chargeback processes to promote accountability. The key to success lies in creating a clear tagging framework, enabling those tags in the AWS Billing and Cost Management console, and maintaining consistent tagging practices across your organization.
To reduce the manual effort involved, automated tools can be a game-changer. For example, Opsima (https://opsima.ai) offers automated cost optimization, helping you lower your AWS bills by up to 40%. It achieves this by managing resource commitments like RIs and Savings Plans and providing real-time cost monitoring. Opsima supports a variety of AWS services - like EC2, RDS, and Lambda - without altering your infrastructure or accessing your data. With a quick 15-minute setup and a pay-as-you-save pricing model, you only pay a fraction of the savings you realize.
FAQs
How can AWS Cost Allocation Tags help manage cloud spending more effectively?
AWS Cost Allocation Tags are labels you can attach to resources like EC2 instances, S3 buckets, or RDS databases. These tags help you track spending based on specific dimensions, such as departments, projects, or cost centers. Once enabled, they provide detailed insights into your AWS costs, helping you pinpoint which teams or applications are driving expenses.
These tags are especially useful for showback (sharing cost data to raise awareness) and chargeback (assigning costs to internal budgets). This approach encourages accountability and allows organizations to create dashboards that track spending patterns, measure ROI, and stick to their budgets. Opsima takes it a step further by using these tags to automate cost management, helping businesses cut AWS bills by up to 40% without compromising flexibility or privacy.
How can I enable and use cost allocation tags in AWS to track spending?
To start using cost allocation tags in AWS, here's what you need to do:
- Log in to the AWS Management Console and head to the Billing and Cost Management section. From the left-hand menu, select Cost Allocation Tags.
- Choose the tags you want to track - these can be user-defined tags or AWS-generated ones like
createdBy. Keep in mind, AWS might take up to 24 hours to activate the tags and another 24 hours for the data to show up in your reports. - Assign tags to your resources through tools like the Tag Editor, AWS CloudFormation templates, or even automation scripts.
- Examine your tagged cost data in Cost Explorer or by generating cost allocation reports. This will allow you to break down expenses by service or resource.
Once your tags are set up and active, tools like Opsima can help you dig deeper into your tagged cost data. They can pinpoint areas where you could save money and make your AWS usage more efficient - all while maintaining performance.
What are the best practices for consistent AWS tagging to track costs effectively?
To keep your AWS tags consistent and improve cost management, start with a well-defined tagging strategy. Develop a standardized list of tag keys, such as environment, owner, and cost-center, along with approved values. This ensures all teams follow the same structure. Make this tagging policy widely accessible to stakeholders, and designate specific tags as mandatory for effective cost tracking.
You can streamline tagging by automating the process during resource creation. Tools like AWS Tag Editor or CI/CD pipelines can help with this. It's also important to conduct regular audits to catch missing or outdated tags. Use AWS governance tools like Config Rules or Service Control Policies to enforce compliance across your resources.
As your business evolves, adapt your tagging strategy to meet new requirements. To simplify this process, consider platforms like Opsima for automating tag discovery, enforcement, and optimization, which can provide clearer cost insights with less manual effort.